To use scheduled tasks you need to do two things:
- Define a task in your code using
schedules.task().
- Attach a schedule to the task either using the dashboard or the SDK.
A task can have multiple schedules attached to it.
Defining a scheduled task
import { schedules } from "@trigger.dev/sdk/v3";

//this task will run when any of the attached schedules trigger
export const firstScheduledTask = schedules.task({
  id: "first-scheduled-task",
  run: async (payload) => {
    //when the task was scheduled to run
    //note this will be slightly different from new Date() because it takes a few ms to run the task
    console.log(payload.timestamp); //is a Date object

    //when the task was last run
    //this can be undefined if it's never been run
    console.log(payload.lastTimestamp); //is a Date object or undefined

    //the schedule id (you can have many schedules for the same task)
    //using this you can remove the schedule, update it, etc
    console.log(payload.scheduleId); //is a string

    //you can optionally provide an external id when creating the schedule
    //usually you would set this to a userId or some other unique identifier
    //this can be undefined if you didn't provide one
    console.log(payload.externalId); //is a string or undefined

    //the next 5 dates this task is scheduled to run
    console.log(payload.upcoming); //is an array of Date objects
  },
});
timestamp - the time the task was scheduled to runlastTimestamp - the time the task was last runscheduleId - the id of the schedule that triggered the taskexternalId - the external id you (optionally) provided when creating the scheduleupcoming - the next 5 times the task is scheduled to run
This task will NOT get triggered on a schedule until you attach a schedule to it. Read on for how
to do that.
Supported CRON syntax
*    *    *    *    *
┬    ┬    ┬    ┬    ┬
│    │    │    │    |
│    │    │    │    └ day of week (0 - 7, 1L - 7L) (0 or 7 is Sun)
│    │    │    └───── month (1 - 12)
│    │    └────────── day of month (1 - 31, L)
│    └─────────────── hour (0 - 23)
└──────────────────── minute (0 - 59)
When schedules won’t trigger
There are two situations when a scheduled task won’t trigger:
- For Dev environments scheduled tasks will only trigger if you’re running the dev CLI.
- For Staging/Production environments scheduled tasks will only trigger if the task is in the current deployment (latest version). We won’t trigger tasks from previous deployments.
Attaching schedules in the dashboard
You need to attach a schedule to a task before it will run on a schedule. You can attach static schedules in the dashboard:
Go to the Schedules page
In the sidebar select the “Schedules” page, then press the “New schedule” button. Or you can
follow the onboarding and press the create in dashboard button. 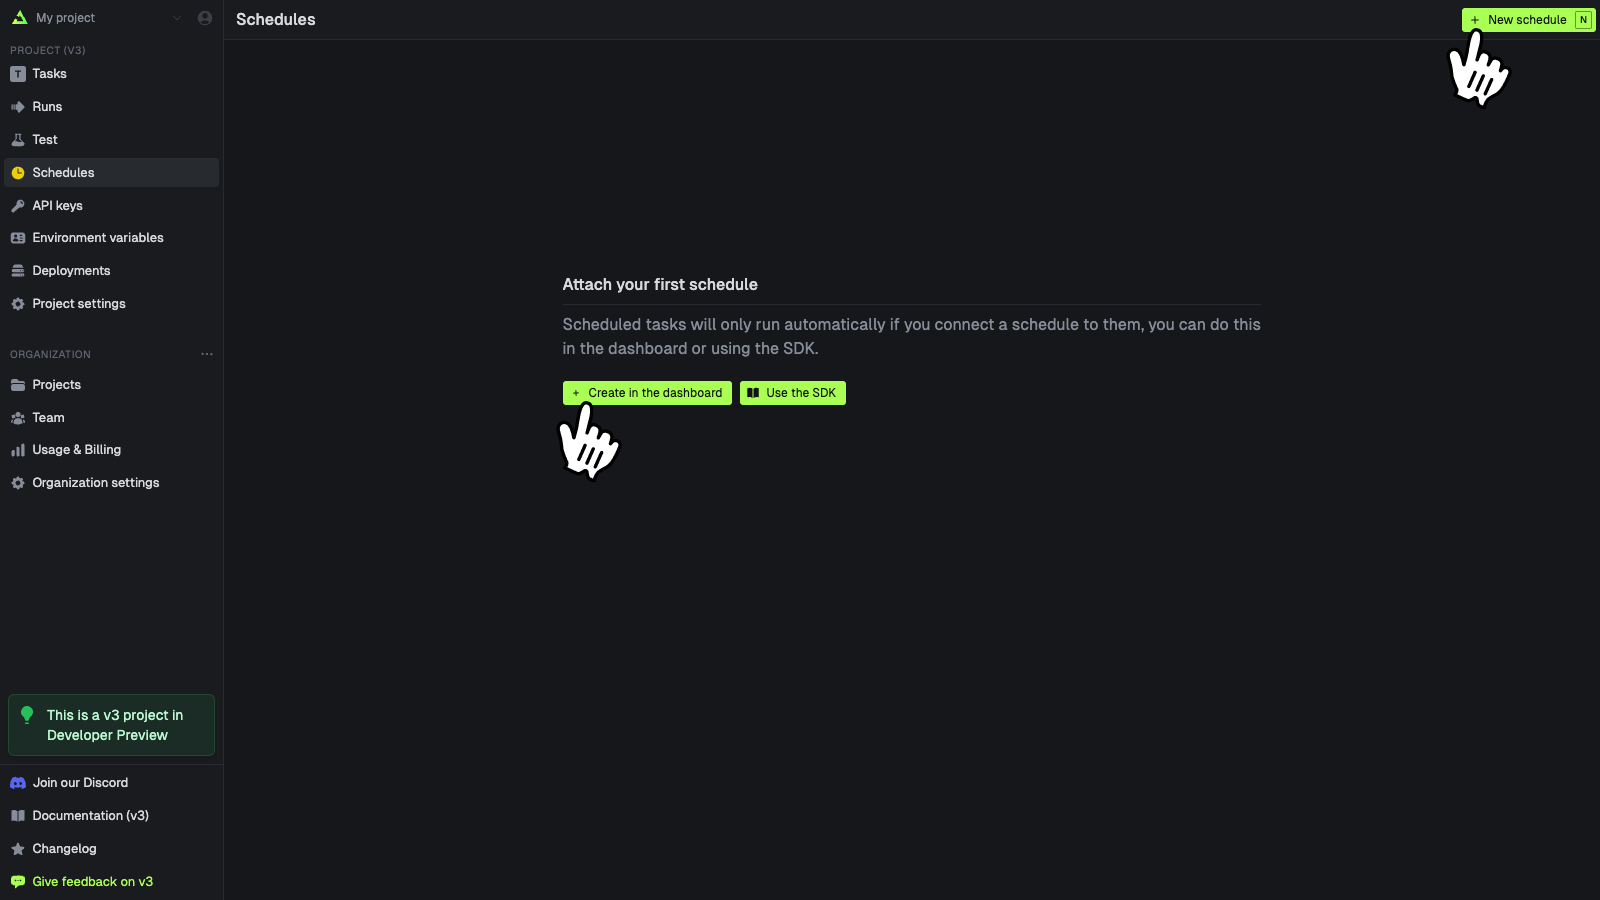
Create your schedule
Fill in the form and press “Create schedule” when you’re done. 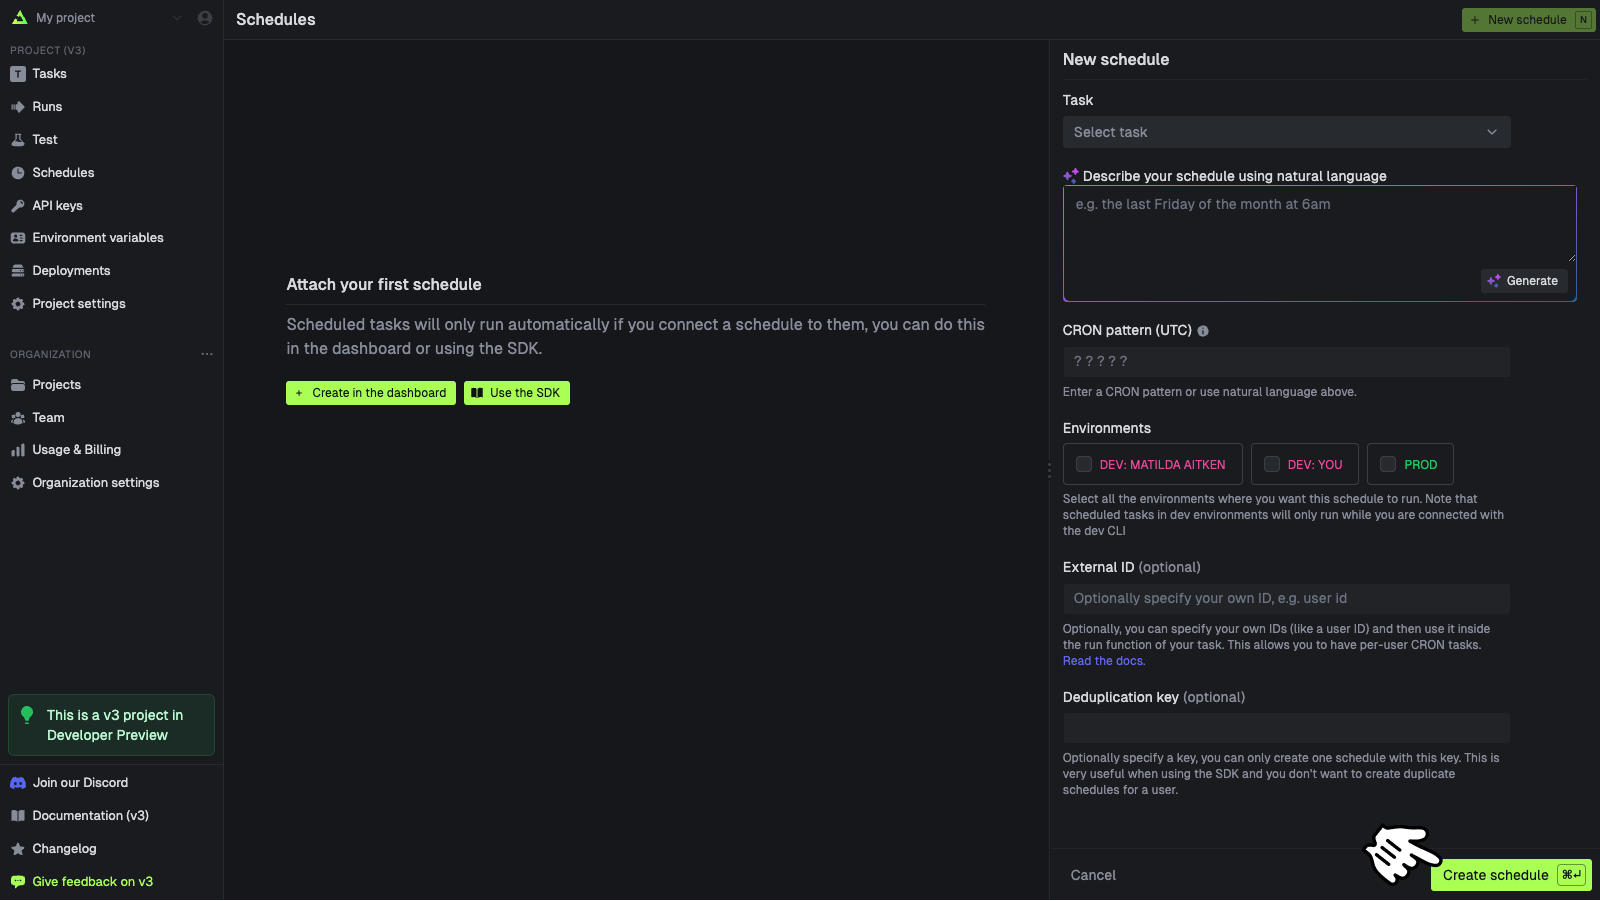 These are the options when creating a schedule:
| Name | Description |
|---|
| Task | The id of the task you want to attach to. |
| CRON pattern | The schedule in CRON format. |
| External id | An optional external id, usually you’d use a userId. |
| Deduplication key | An optional deduplication key. If you pass the same value, it will update rather than create. |
| Environments | The environments this schedule will run in. |
Attaching schedules with the SDK
You call schedules.create() to create a schedule from your code. Here’s the simplest possible example:
const createdSchedule = await schedules.create({
  //The id of the scheduled task you want to attach to.
  task: firstScheduledTask.id,
  //The schedule in CRON format.
  cron: "0 0 * * *",
});
The task id must be a task that you defined using schedules.task().
task, cron, and externalId but only one with the same deduplicationKey.
This means you can have thousands of schedules attached to a single task, but only one schedule per deduplicationKey. Here’s an example with all the options:
const createdSchedule = await schedules.create({
  //The id of the scheduled task you want to attach to.
  task: firstScheduledTask.id,
  //The schedule in CRON format.
  cron: "0 0 * * *",
  //Optionally, you can specify your own IDs (like a user ID) and then use it inside the run function of your task.
  //This allows you to have per-user CRON tasks.
  externalId: "user_123456",
  //(Optional) You can only create one schedule with this key.
  //If you use it twice, the second call will update the schedule.
  //This is useful if you don't want to create duplicate schedules for a user.
  deduplicationKey: "user_123456-todo_reminder",
});
Dynamic schedules (or multi-tenant schedules)
By using the externalId you can have schedules for your users. This is useful for things like reminders, where you want to have a schedule for each user.
A reminder task:
import { schedules } from "@trigger.dev/sdk/v3";

//this task will run when any of the attached schedules trigger
export const reminderTask = schedules.task({
  id: "todo-reminder",
  run: async (payload) => {
    if (!payload.externalId) {
      throw new Error("externalId is required");
    }

    //get user using the externalId you used when creating the schedule
    const user = await db.getUser(payload.externalId);

    //send a reminder email
    await sendReminderEmail(user);
  },
});
import { reminderTask } from "~/trigger/reminder";

//app/reminders/route.ts
export async function POST(request: Request) {
  //get the JSON from the request
  const data = await request.json();

  //create a schedule for the user
  const createdSchedule = await schedules.create({
    task: reminderTask.id,
    //8am every day
    cron: "0 8 * * *",
    //the user id
    externalId: data.userId,
    //this makes it impossible to have two reminder schedules for the same user
    deduplicationKey: `${data.userId}-reminder`,
  });

  //return a success response with the schedule
  return Response.json(createdSchedule);
}
Testing schedules
You can test a scheduled task in the dashboard. Note that the scheduleId will always come through as sched_1234 to the run.
Go to the Test page
In the sidebar select the “Test” page, then select a scheduled task from the list (they have a
clock icon on them) 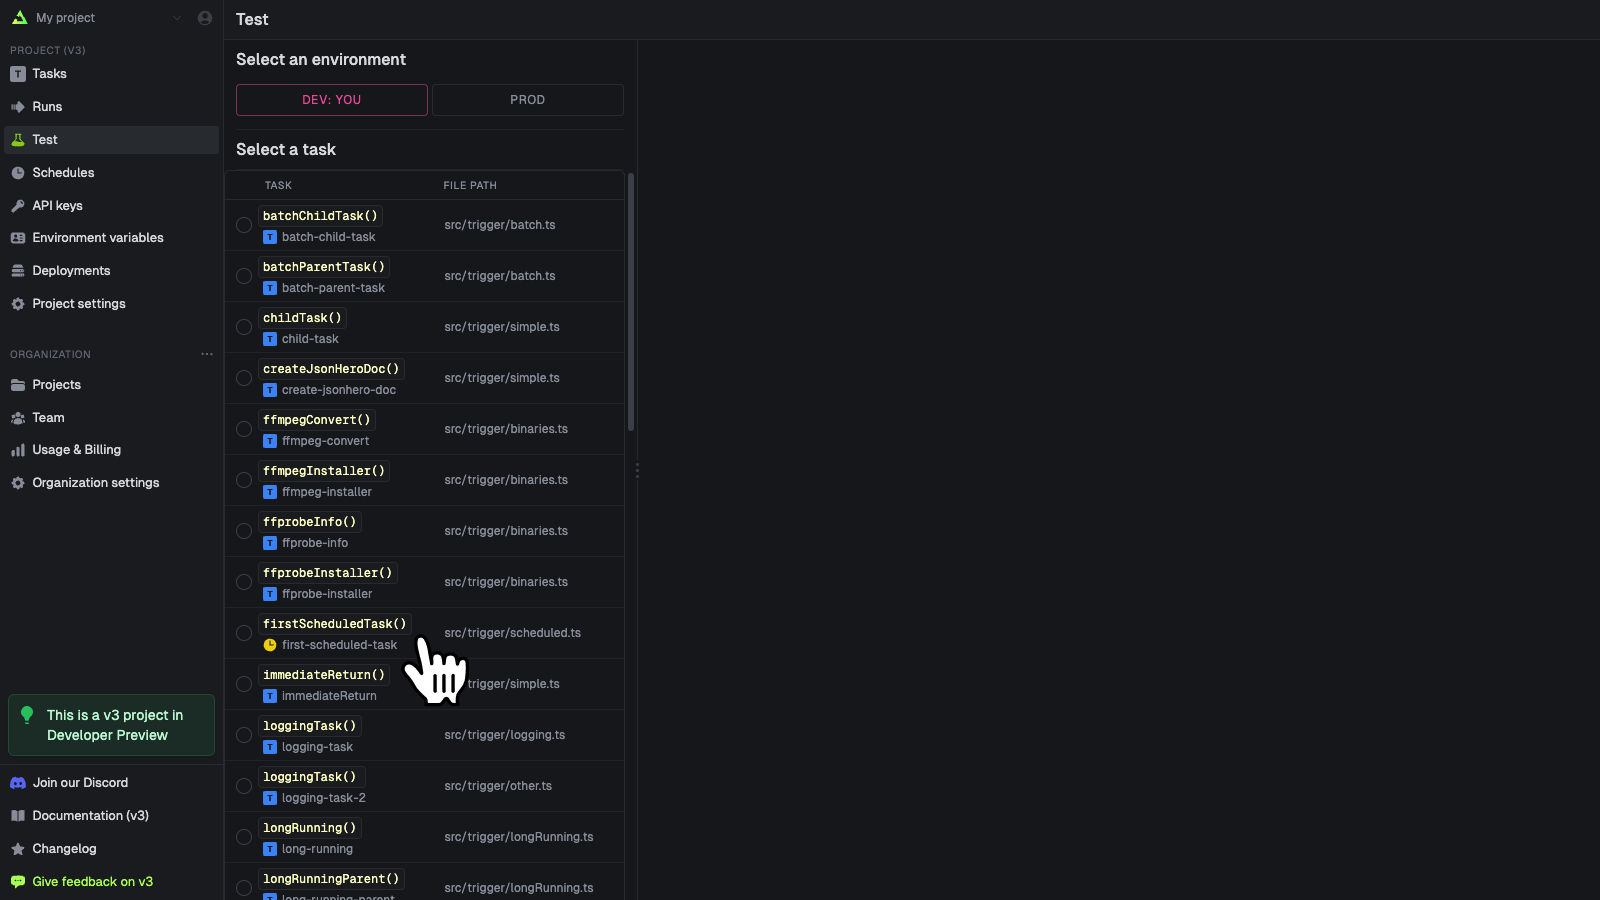
Create your schedule
Fill in the form [1]. You can select from a recent run [2] to pre-populate the fields. Press “Run
test” when you’re ready 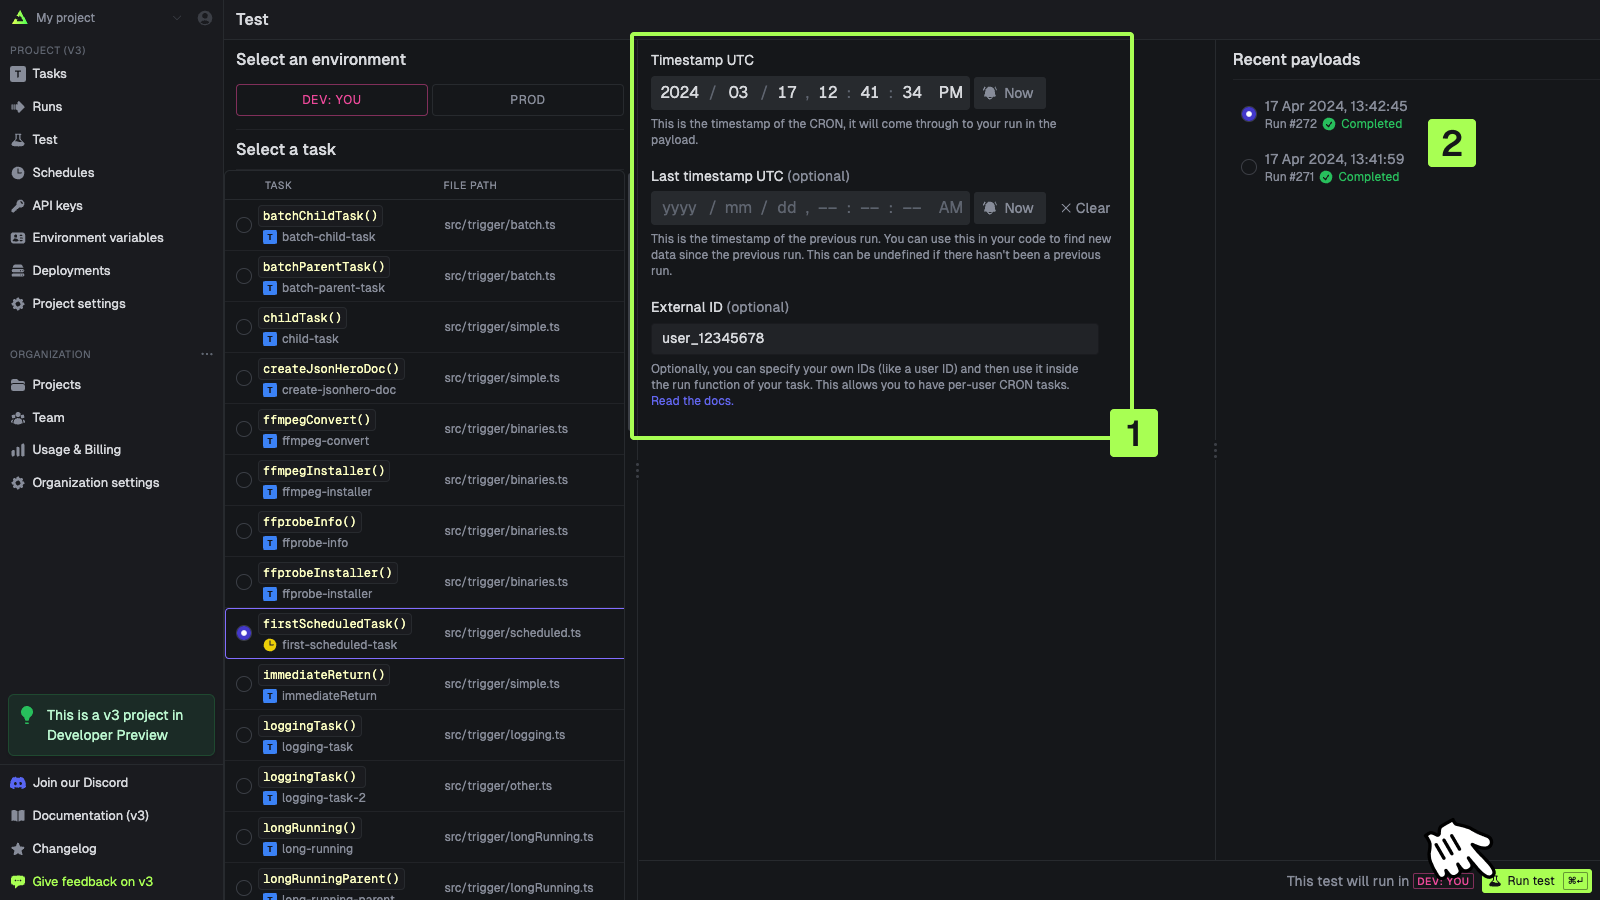
Managing schedules with the SDK
Retrieving an existing schedule
const retrievedSchedule = await schedules.retrieve(scheduleId);
Listing schedules
const allSchedules = await schedules.list();
Updating a schedule
const updatedSchedule = await schedules.update(scheduleId, {
  task: firstScheduledTask.id,
  cron: "0 0 1 * *",
  externalId: "ext_1234444",
});
Deactivating a schedule
const deactivatedSchedule = await schedules.deactivate(scheduleId);
Activating a schedule
const activatedSchedule = await schedules.activate(scheduleId);
Deleting a schedule
const deletedSchedule = await schedules.del(scheduleId);